. . . Continued
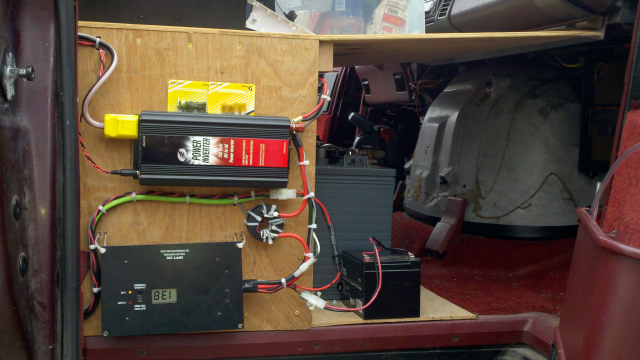
A closeup of the DC system. Lower left - BZ 250W MPPT charge controller (courtesy of Rover), Upper left - Schumacher 750W MSW inverter (spare fuses wedged above it), "Ring" between charge controller and inverter - DIY remote shunt for the meters in the cargo area, lower right - Auxiliary 12V 12Ah SLA (on maintenance charge) for various miscellaneous uses. The astute eye will recognize this as the original "main" battery from the wally world days.
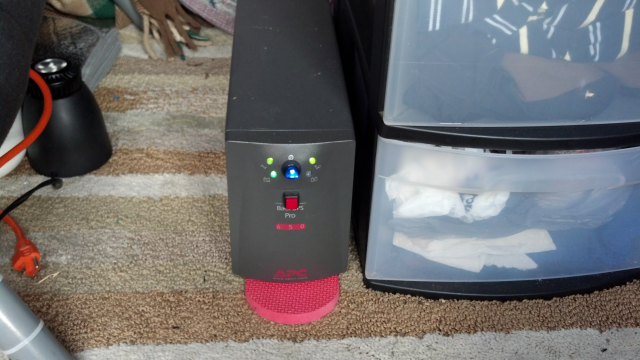
This is one of my more prized creations. It was my first attempt at a real smart charger that was capable of more than a couple of amps for some NiCds and such. It is a 3 stage Bulk/Absorb/Float charger that I made out of an old APC UPS. I dumped quite a bit more money into it than I care to ever admit, but it's unstoppable... 25A on bulk mode, and up to 4A on absorption and float modes. With the manipulation of a couple of switches on the back, "slow recovery" (from a severely discharged battery) to prep it for bulk mode can be accomplished, as well as equalization. In "normal" mode, it is fully automatic, just set and forget. The little red disc underneath the front of it is to prop it up so it can get air properly until I make an appropriate board for it to sit on.
The problem of heat made itself well known in the wally world days... and while things have changed, heat is still a problem. Only this time, it's not an issue of getting rid of it, its producing it. I took a hybrid approach to this, and while the circumstances aren't ideal yet, I have made several strides in maximizing bang for buck. The heating system is by far the most complex system in the van, as it has several modes of operation to optimize energy usage depending on what is available.
This is the rear heater, one of two electric heating systems in operation. It is comprised of two 200W "MyHeat" $10 jobbies from wally world, and each has been modified so that the heating elements and fans are controlled independently. For the rear set, the two heaters blow into a common "manifold", with a single 4" fan doing most of the grunt work for moving the air through them.
The front heat heater is designed a little bit differently than the rear, even though all the same components are used. Both 200W units have been modified as well, with a single "grunt" fan to do the work. The difference is in how it mixes the air before it comes out. Early on, it was noticed that there were drafts that would form when the air got to a certain temperature, and was made worse by the vent fan running. After several experiments, this is what I came up with...
To describe this accurately, operation needs to be broken down into the 4 basic modes that the heat system operates in. There is a single stage digital thermostat for basic heat regulation (High power), and the "fan on/auto" switch is used as draft control (Low power).
On grid, High power ties all 4 heating elements together in parallel, and runs them as if they were a single units. All fans spool up to a pre-set optimum speed selected to get maximum output from the elements. The total heat output is 800W, and is sized appropriately for the van, capable of exceeding a 40F differential between inside and outside when conditions are right (no wind, "insulation" appropriately placed, etc).
On battery, High power ties both front elements and only one of the rear elements in parallel. The primary reason for this is that the inverter is rated at 750W; I didn't want to push my luck by running it at 800W, so by dropping one element out, the total is 600W.
With either grid or battery, Low power ties the front two elements in parallel, and the rear two elements in parallel, and the two sets in series with each other, for a total of 200W. The fans run at a reduced speed to get optimum heat from the elements.
The Fan control is set up with a buck converter that allows both speeds to be independently adjusted, because ceramic heating elements aren't linear devices. There is a dip in the resistance (corresponding to a peak in heat output) as they warm up. If the fans run too fast, they won't reach optimum output. If they run too slow, they risk overheating.
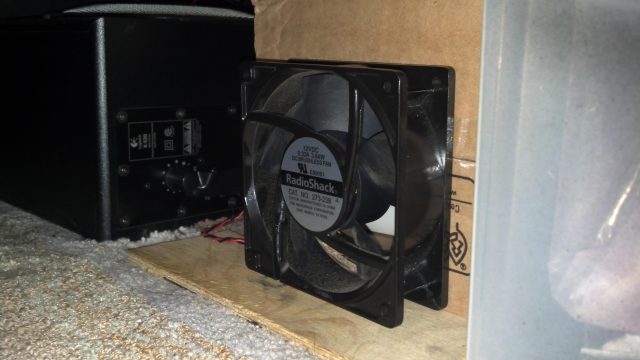
All 6 fans are tied in parallel, and are controlled by a single buck converter. There is also an added feature I implemented using the current limiting of the buck. I set them to run at the highest speed, then backed the current limiting down until it just began to kick in. The result is a nice, smooth, quiet transition between off/low/high. The fans make little more noise than the typical heating vents in a house system.
The next 3 pictures show the (admittedly) scary nature of a "grown in place" system. If I were to ever rebuild it, I would do the next version on a suitably sized board and make everything nice and neat. Such is life...
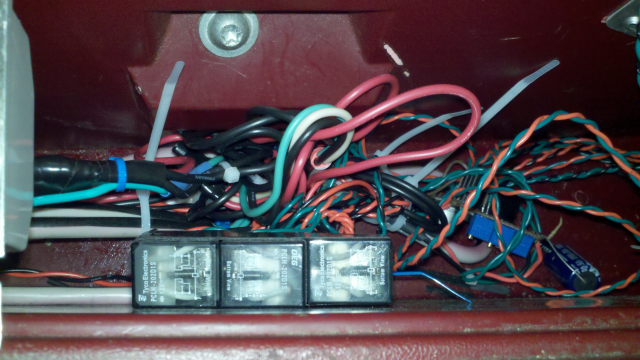
The original version of the heater control system after becoming functional. In this particular case, it was cold, I was running out of propane, and just needed to get it online. Rat nest ensued.

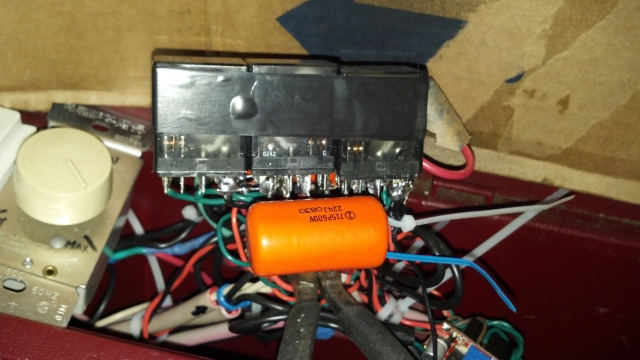
There was a serious problem with the relay that changes modes from low to high that required attention ASAP. There was severe arcing that was setting up plasma paths from hot to neutral when the relay would release at the peak of the sine wave. This was damaging the contacts, pitting them and causing deposition of contact material on the inside of the relay's case, and even tripped a 15A breaker not once but twice! Something needed to be done, and quick. The fix came after a long brainstorm in IRC between Ross, myself, and others. The subject of solid state relays (which apparently aren't readily available in DPDT form), and so the concept of even a DIY version involving triacs and such came up. Drew up the schematic and everything. In a moment of giggles, I thought, why not, nothing to lose... I had a set of 0.22uF 600V caps that were supposed to be for another part of the van, but were nowhere near the right part for that. I figured, what the hell... and soldered them across the problem contacts. This is what resulted (propped up in place by a pair of needlenose for the pic), and guess what? No more arcing!

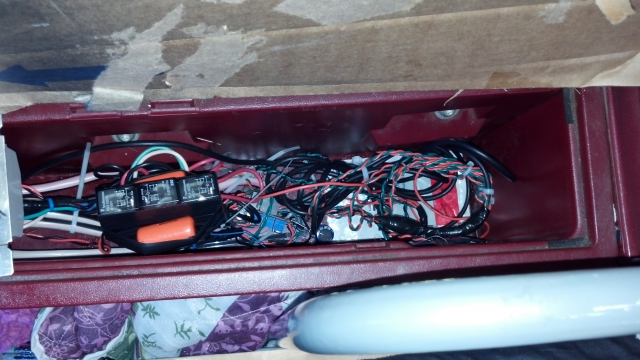
So, here it sits, all packed down in the cubby, with the thermostat extensions run out of it. Also integrated into this system now is the all-important "on-battery heat-on" alarm. I had this concept on my mind, and was tinkering with it one night, and Murphy's law struck like lightning the very next day. And guess what? No alarm. Yet.
This simple, yet important addition to the system works similar to a 3 way switch for the lights in a house. The major difference is that one of the switches is replaced by a set of relay contacts that is controlled by whether or not the grid is present. This forces the alarm to always be in an "armed" state. When grid is disconnected and the heat is on (elements do not have to be actually operating), the relay switches over and completes the path, setting off a really annoying beeper to let you know that you're potentially going to drain the batteries from running the heat. Acknowledging the alarm and muting it is simple... flip the switch to the other position. Life is quiet, and any drain from heat is of your own doing; it did warn you after all, and you told it to shut up.
When the grid becomes available once again, the annoying beeping comes back with the idea being that you need to "reset" the alarm back to it's "armed" position so that it can once again alert you of potential battery drain.
I can't speak for everyone, but I'd rather be rudely awakened in the middle of the night to change how I heat the van, than to wake up to an even more menacing sound - the inverter low battery alarm.
If the master heat switch is off, the alarm is disabled.
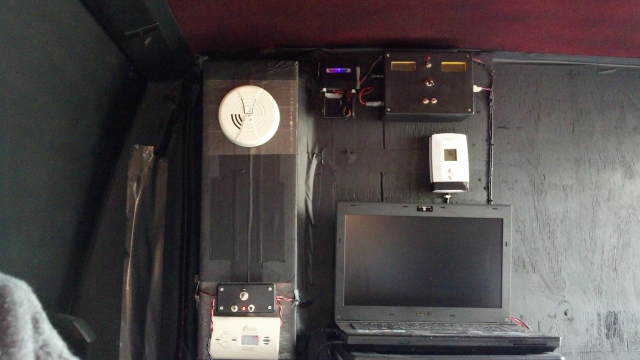
This is the new configuration for the instrumentation. The light trap, smoke/carbon monoxide detectors, meters, thermostat and "movie screen" are all in one spot now. When I changed over to using the vent fan to push hydrogen out, I read up on carbon monoxide, and found that it has a density almost identical to air, so it didn't matter where I pulled the air from. Having the intake lower does however remove the cooler air that sinks to the bottom, rather than warm air from the top which would be a waste, of course.
Everything is in working order here, and tested regularly, so those that were concerned with my wellbeing from smoke/fire/carbon monoxide can rest easier.
One interesting note about carbon monoxide detectors... while they are calibrated to carbon monoxide, they will detect any flammable substance in the air (the detection cell senses these gasses by oxidizing them within the cell). I have gotten readings on it when there was absolutely no source of burning hydrocarbons (ie propane) when I did a test and sealed the van up the best I could and put the batteries on a high charge. The hydrogen caused the CO detector to register, although the numbers presented had nothing to do with the actual amounts of hydrogen in the air. Confirmed that this is indeed the case from various sources on the web. Useful thing to know.
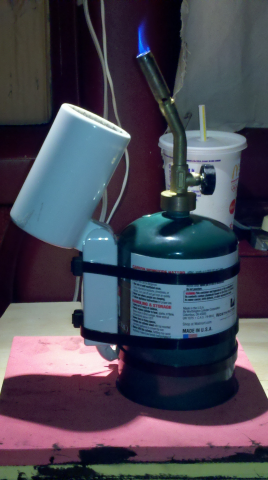
Ahh, yes, the classification of heat and light sources that started all the paranoia on the first van posting. Heat, fire, carbon monoxide, and this little monster is no exception to any of those. It's simple in operation, although it has been modified since it's original inception.
It no longer uses the electric element inside the dryer, in fact, it's been completely removed. It now only uses the fan running variable speed on, you guessed it, a buck converter. Those things are just so handy, arent they?
The purpose of the fan isn't to "get the heat out", it is to dilute the flame by speeding up the air passing by it, acting like an active flame arrestor. A flammable gas gets it's stoichiometric mixture disrupted by this increase in air velocity, decreasing the likelihood of ignition. It's not foolproof, but does help. It's the same reason that jet engines have a special part of the combustion chamber that slows the air down right before it goes in to be combined with fuel - if it's moving too fast, it won't ignite.
This heater is not controlled by the thermostat in any way, and is primarily for use when the van is operating on battery. The electric heat is only meant to augment the propane when the van is in this mode.
Continued . . .


