Author Topic: Flashing LED Lights for Bicycle  (Read 6801 times)

0 Members and 1 Guest are viewing this topic.

Offline WooferHound

  • Technowhiz
  • Global Moderator
  • Hero Member
  • ******
  • Posts: 897
  • Karma: +40/-3
  • Huntsville Alabama USA
    • My personal webpage
Re: Flashing LED Lights for Bicycle
« Reply #15 on: October 03, 2018, 11:25:56 pm »
Woof, I don't wish to pick on you ... but cripes, can you check your work??

Firstly. you can't have a current flow into an open circuit.
Next, 0.125mA seems waaaay too low. Certainly too low to be any practical use.
If your LEDs are drawing 240mA, it would take you 80 WEEKS of uninterrupted full sun to charge your battery up enough for 1 HOUR of operation, at 0.125mA. And over that timeframe, the self-discharge would eat most of it up anyway.

1N4007 or even schottky diodes at those voltages are hideously inefficient. A tiny P-channel mosfet off ebay will cost you less than a 1N4007 diode, and when wired as an "ideal diode" will have virtually no voltage drop in this application.

Yes, a significant typo there. That solar panel produces 125ma (short circuit) at 4.75 volts. But after today, charging through the Schottky diode the battery only gets up to 3.6 volts, which is fine for my uses. In my discharge tests, these 18650 batteries have great power between 3.7 and 3.2 volts. The 240ma bike lights could run more than a couple of hours after beeing charged up to 3.6 volts, plus safety when charging and using these lithium batteries up to 3.6 at .125 amp is almost guaranteed.

And yes you are also correct talking about how difficult it is to work with voltages between 2.6 and 4.2.
----- W o o f e r h o u n d -----
My Renewable Energy Projects

Offline WooferHound

  • Technowhiz
  • Global Moderator
  • Hero Member
  • ******
  • Posts: 897
  • Karma: +40/-3
  • Huntsville Alabama USA
    • My personal webpage
Re: Flashing LED Lights for Bicycle
« Reply #16 on: October 05, 2018, 04:58:53 am »
those batteries from the laptop pack are lithium cobalt batteries they really do not like being charged by anything other than chargers specifically designed for them and they have a tendency to get angry and explode and spit fire that will not go out when abused google lipo fire there are allot of videos of it. i would suggest spending a couple bucks and buying a few batteries of a safer chemistry to play with

might i suggest a couple of those aa size lifepo4 cells with built in over voltage and over discharge protection  be much safer

Yes Kurt, you are very correct that charging Lithium batteries incorrectly can be Fire and Death ! !

However I have spent some hours reading about Lithium 18650 charging, plus I have become a "YouTube Expert" on the subject.

The Key Points are . . .
Do Not Exceed 4.2 Volts or there will be Fire
Do Not Discharge Below 2.5  Volts or you will damage the Cell
Do Not Charge or Discharge the battery faster than Half of it's capacity
Do Not Short-Curcuit or there Will be Fire
Use Balanced Charging. Lithium Batteries in Series do not remain Equally Charged and must be Maintained Individually to keep the Charge Equalized
It is also good to keep them Cool as possible and Protect them from Physical Damage

So if you are only using a single 18650 battery, with low charge/discharge currents, and stay between 2.6 volts to 4.1 volts (hard limits), you will have a lovely experience.
It acts much like a large capacitor and as long as you watch the voltage limits it is a happy playground to play in.
I built a Dual 18650 charger using a 6 volt centertapped transformer, very few parts and charges the batteries up between 4.0 & 4.1 volts over a 6 hour period.

----- W o o f e r h o u n d -----
My Renewable Energy Projects

Offline WooferHound

  • Technowhiz
  • Global Moderator
  • Hero Member
  • ******
  • Posts: 897
  • Karma: +40/-3
  • Huntsville Alabama USA
    • My personal webpage
Re: Flashing LED Lights for Bicycle
« Reply #17 on: October 06, 2018, 06:53:09 am »
Did a Discharge test yesterday. Started with an almost full 18650 battery. Connected a 15 ohm resister making a 250ma load which is the same load as my lights would make. Checked the voltage every hour and noted it down

4.04
3.94
3.84
3.74
3.65
3.60
3.57
Sleeping
3.45
3.40
voltage rapidly declines at this point and it does not take long to get down to the 2.5 volt limit

So most of the power appears between 3.7 and 3.4 volts. My Bicycle Lights would work well for 5 hours with a charge of 3.6 volts.
At home the bike is parked outside, in some bushes around the house and the solar panel would get Full Sun a couple of hours a day which should be plenty. I would use the lights for about an hour a week riding at night, usually about 20 minutes on late rides home from work.

Was also thinking about adding a connector for attaching accessories, like Christmas Lights or a small LED Spotlight, maybe an MP3 player or something. Would also use the connector for checking the battery voltage. Wondering how to do that and stay weatherproof?

Made a Order to Parts Express for the LED resisters using 3.6 volts as the source voltage, 82 ohms for Red and 33 ohms for White. Also ordered some 56 ohm resisters for White LEDs on a 4 volt full charged battery.  Also have some 18650 Battery holders coming for some future projects.
----- W o o f e r h o u n d -----
My Renewable Energy Projects

Offline WooferHound

  • Technowhiz
  • Global Moderator
  • Hero Member
  • ******
  • Posts: 897
  • Karma: +40/-3
  • Huntsville Alabama USA
    • My personal webpage
Re: Flashing LED Lights for Bicycle
« Reply #18 on: October 10, 2018, 05:24:48 pm »
Getting almost done on this Bicycle Lighting project


Took the Front Reflector off of the bike and epoxy glued 6 white LEDs to the back of it. The dropping resisters were included to make the wiring work out better. This is all of the LEDs for the Front of the bicycle. Top two will be aimed Far Field, middle LEDs aimed Near Field. The Bottom LEDs have had the lens on the front ground flat so they throw a wide beam, and they will be aimed straight down at the road. I have tested this a few times with a stand-alone precharged battery and it works wonderfully.


This is the front & back of the Solar Panel. I glued some aluminum foil to the back of the front panel to help reflect the heat away from the battery. There will be 8 LEDs placed all over the back of the bike, 4 white pointed down at the road, and 4 red pointed to the rear of the bike. All the LED Dropping Resisters are inside the inside this box so they won't be exposed to weather outside. A phone wire goes to the front for a negative connection and a power switch on the handle bars. All 8 LEDs will have a pair of wires going to each one.


Here is the Solar Panel assembled and ready to install on the bike. There is a 1/8 inch connector that supplies unswitched power direct from the battery. Thinking about epoxy gluing the LEDs into their final position. Total of 14 LEDs: 4 white forward, 6 white wide angle pointed down at the road, and 4 red wide angle pointed to the rear, making a total of .280 amp.

Working for a few days so may be awhile before this is finished.
----- W o o f e r h o u n d -----
My Renewable Energy Projects

Offline hiker1

  • Full Member
  • ***
  • Posts: 178
  • Karma: +13/-1
  • hiker
Re: Flashing LED Lights for Bicycle
« Reply #19 on: October 22, 2018, 10:34:25 pm »
Your all lit up..now for sound...here's my little solar powered radio..old Sony ..bike radio...used one of my solar lawn lite..for power..it has one fat 3.5-4v batt built in..perfect for my 2 cell radio...
just do it

Offline WooferHound

  • Technowhiz
  • Global Moderator
  • Hero Member
  • ******
  • Posts: 897
  • Karma: +40/-3
  • Huntsville Alabama USA
    • My personal webpage
Re: Flashing LED Lights for Bicycle
« Reply #20 on: January 10, 2019, 08:10:34 am »
Unfortunately my Bicycle was stolen last week. It was hiding it behind some bushes in front of the house, but somebody knew it was there and got it. I had a lock on the bike but wasn't using it.

I had installed the Solar panel onto the back of the bike and had working lights in the front for a coupla months. Had wiring installed for the Tail & Marker lights but had not installed the LEDs yet so wires were sticking out everywhere. The night before, I had worked on the front axle and put it all back together without grease or oil. The rear brakes had just stopped working. While it sucks to lose that bike, I am happy that it was in poor condition when they got it. Originally purchased at a garage sale for $25, but had $75 of puncture proof tires and $50 baskets on it.

The stolen bike was a 27 inch Road Bike and not made for the Inner City riding that I am doing almost daily. On Craigslist I found a 26 inch mountain bike with Road Tires on it, Perfect for jumping curbs and fast speeds. It was an older bike but has lots of New working parts on it, plus the guy gave me a buncha spare parts and a pair of innertubes. Got it for $150 and rode it 2 miles home. I've installed bike locks in it's parking spot behind the bushes and plan to put Motion Detector alarms in the area too.

So now it's time to Trick Out the new bike with Solar lighting, Saddlebag baskets, and a Bike computer speedometer. The baskets are on order and I've picked out a fancy bicycle computer that has a thermometer on it.

The Solar Lighting looks like it will be much easier to make now that Solar Charged Power Banks are cheaply available on eBay. I have ordered this one that can hold a couple of 18650 batteries and supply a constant unswitched 5 vdc output ...
https://www.ebay.com/itm/2W-Solar-Panel-Charger-for-1-2-Section-18650-Battery-Phone-Charging-Charger/312419337228
This is almost already made compared to the one on the other bike. Will need to weatherproof it a little bit. Has plenty of room for the minimal electronics that will need to be added. Plus it can charge my phone too.


----- W o o f e r h o u n d -----
My Renewable Energy Projects

Offline WooferHound

  • Technowhiz
  • Global Moderator
  • Hero Member
  • ******
  • Posts: 897
  • Karma: +40/-3
  • Huntsville Alabama USA
    • My personal webpage
Re: Flashing LED Lights for Bicycle
« Reply #21 on: February 01, 2019, 03:00:29 pm »
Today, I received the Solar Powered USB Power Bank that I had ordered a few weeks ago.


Tested it a bit and in almost Full Sun the panel puts out 6 volts at a short circuit current of 350ma, so about 2 watts


The Solar power goes through a diode straight to the battery and if left alone it will badly overcharge the battery. Have some 4056 charge controllers ordered to fix this problem.


It will hold 1 or 2 batteries in parallel. One 18650 battery is plenty to power the planned bike lighting for about 6 hours, So I'll only use 1 in there. I tested the 5v USB output and my phone will charge from it. But that little boost converter will probably be removed as it isn't needed.
----- W o o f e r h o u n d -----
My Renewable Energy Projects

Offline bj

  • Hero Member
  • *****
  • Posts: 735
  • Karma: +23/-0
  • Lamont, Alberta, Canada
Re: Flashing LED Lights for Bicycle
« Reply #22 on: February 02, 2019, 06:50:25 am »
  You've got mail
"Even a blind squirrel will find an acorn once in a while"
bj

Offline WooferHound

  • Technowhiz
  • Global Moderator
  • Hero Member
  • ******
  • Posts: 897
  • Karma: +40/-3
  • Huntsville Alabama USA
    • My personal webpage
Re: Flashing LED Lights for Bicycle
« Reply #23 on: February 12, 2019, 10:33:35 pm »
I was waiting for the TP4056 Charge Controllers to arrive before finishing the Solar Bike Lighting, Then they got here while I was working a large show over the weekend. But today was a day off so I finished out the power box then installed it all on the bike.


First pic is the Power Box fully finished but without the solar panel cover.
The blue module (top right) is the Lithium Ion 18650 charger module. it also has over\under charge protection on it.
The battery compartment is covered with aluminum foil to help reflect heat away. It can hold 2 batteries but only 1 should be plenty.
The 2 power switches are on the far left, very small and hard to see. One switch is for the white Headlight, a 1w LED at 300ma. The other switch is everything else, 14 LEDs all over the bike, about 300ma in all.
The small terminal strip on the far right is the Switched power. All LED dropping resisters are here and connect to the outgoing wires.
Four of the LEDs are in the power box too.


When completed there will be 4 Red LEDs across the back, 6 white LEDs in pairs pointed down at the road, 2 yellow LEDs facing out to each side, plus 4 Fast Color Changing LEDs over the headlight to get attention.


The wiring has been run up-front to the headlight area but has not been finished yet. I've been working on it and will have some more pictures of the completed project soon.
----- W o o f e r h o u n d -----
My Renewable Energy Projects

Offline WooferHound

  • Technowhiz
  • Global Moderator
  • Hero Member
  • ******
  • Posts: 897
  • Karma: +40/-3
  • Huntsville Alabama USA
    • My personal webpage
Re: Flashing LED Lights for Bicycle
« Reply #24 on: February 13, 2019, 05:02:03 pm »
A few points that I should make ...
All the small 5mm LEDs have the Lens ground flat and are wide angle, not the normal 9 degree LEDs
The positive contacts in the battery compartmentl were too short making battery contact difficult, but a blob of solder on there fixed it
I glued shiny foil to the back of the solar panel to help reflect heat coming from the panel
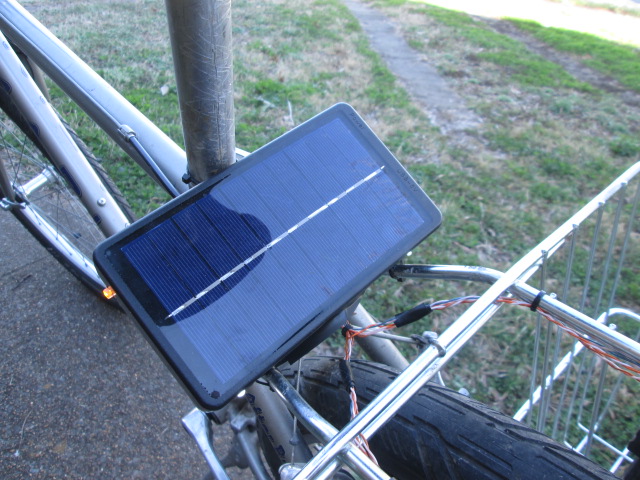


This morning I wanted to test if the panel was charging the battery.
Battery was Discharged down to 3.64 volts. Bike was placed in the light optimized to the Sun
In 4 hours it had charged up to 4.14 volts. I can't see the -Charged- light on the charger module but this should be about Full Charged ... So it is charging.
The solar panel is capable of a max charge rate of 300ma. All the lights on the bike add up to about 650ma, and used for an average of  45 minutes a day. It will almost never get great light. However I think the solar charging will be able to keep up with my expected usage.
Fortunately the batteries are easily accessible and if the charge gets too low, a fresh battery can be put in there quickly.
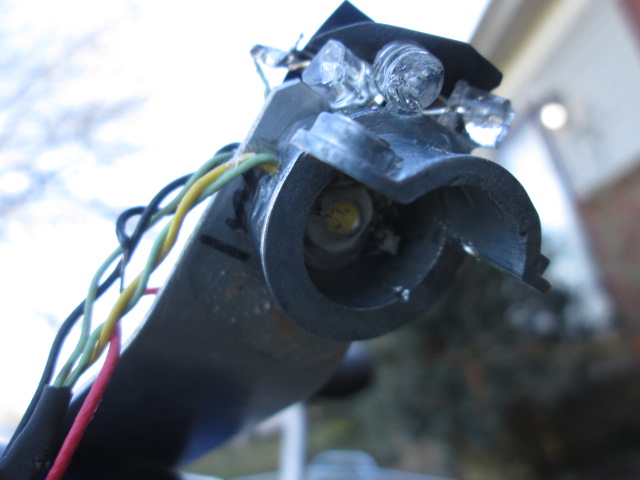


The planned lights on the front of the bike include the White Headlight, 4 or 5 color flashing LEDs, and 2 white lights aimed down at the road. I want to spend some time on this and have installed some quick-n-dirty temporary lighting for now.
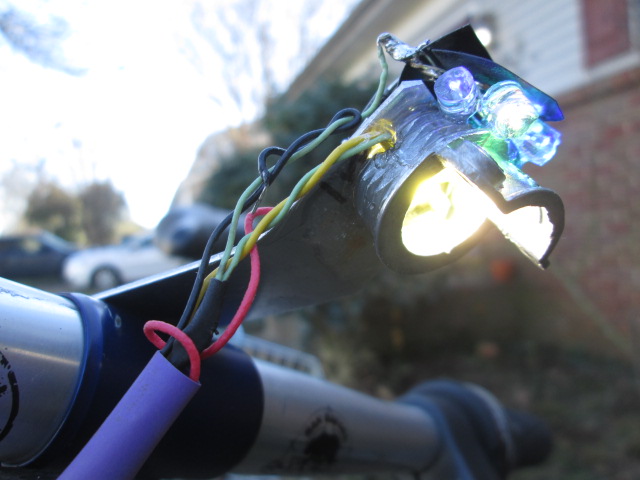


Since a 1w LED Bead light is so small and bright, it is hard to look at directly, so it's a good idea to keep the direct it away from oncoming traffic. This Romex Connector was perfect to control the beam and keep the light away from oncoming drivers. Some Color Flashing LEDs were glued on top to make sure that I get noticed.
----- W o o f e r h o u n d -----
My Renewable Energy Projects