How to Make Jigs for Chainsaw Blades
Due to a recent request from Tomw about how to make the jigs for chainsaw blades, I realized I wasn’t the only one that had been confused about how to make the jigs.
I had stumbled through it and figured it out only 2 weeks earlier.
Here are 3 postings from the backshed about making chainsaw blades.
http://www.thebackshed.com/forum/forum_posts.asp?TID=1194&KW=chainsaw+bladeshttp://www.thebackshed.com/forum/forum_posts.asp?TID=2177&KW=chainsaw+bladeshttp://www.thebackshed.com/forum/forum_posts.asp?TID=1582&KW=chainsaw+bladesAnd a couple from fieldlines.
http://www.fieldlines.com/index.php/topic,140377.msg939084.html?PHPSESSID=d2a3e3169c4bc5d4ba807f5254e7227c#msg939084http://www.fieldlines.com/index.php/topic,138338.msg918076.html?PHPSESSID=d2a3e3169c4bc5d4ba807f5254e7227c#msg918076After reading all of the above, I set out to try my hand at it.
The first thing I did was go to the lumber yard and buy some 2x8’s. If you do this, buy a few extras. So far,
I have wasted 2 of my 2x8’s when they vibrated loose. So now I clamp them to the jig.
You can also use 2x10’s or probably 2x12’s. I haven’t tried the 2x12’s so I can’t say for sure.
My blades were to each be 5 feet long, so I bought 10 foot long boards for the blades and a couple of
8 foot long boards for the jigs. I also bought four 2x4’s, each 8 foot long. The 2x4’s are for the side rails of the jig.
Cut one of the 10 foot 2x8’s in half so you have 2 boards, each 5 feet long.
Lay one of the 8 foot long 2x8’s across your sawhorses, work table, whatever you are going to be using as a
work support. Using whatever pattern you like for the blade shape, lay your template on the blade board and
trace it out. Then use a circular saw, bandsaw, etc., to cut the board to the basic blade shape.
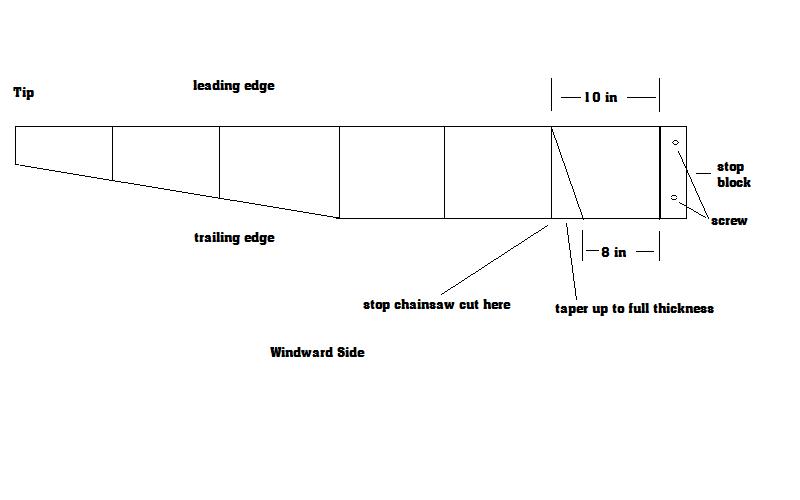
Then mark out the blade for whatever number of stations you will be using.
I marked my stations at every 10 inches starting with the tip. Mark the stations all the way around the blade.
Then on the trailing edge, mark the drop at each station. The measurements that I used were (starting at the tip)
1/16 , 3/16, 3/8, 3/4, and 1-5/8. I took these measurements from Hugh Piggott’s book, A Wind Turbine
Recipe Book (2009- English Units Edition).


" alt="" class="bbc_img" />
Now lay the blade on the jig bottom board and establish where you want the blade to be in relation to left and right.
I left more room on the left end. Then I screwed a stop block to the base, so every blade would sit in the
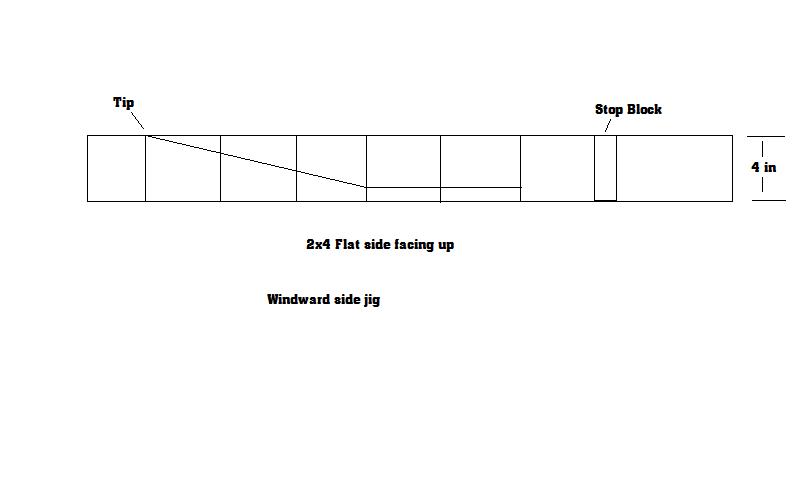
same place. My stop block is on the right side and the tip of the blade is on the left. Take one of the 2x4’s and mark the
position of the stop block. Then mark the position of the stations on the blade onto the 2x4. With the 2x4 lying flat,
mark the drop measurements on it. Then connect the marks with a straight line.


" alt="" class="bbc_img" />
My drawing ability sucks in this program so it is not accurate or to scale.
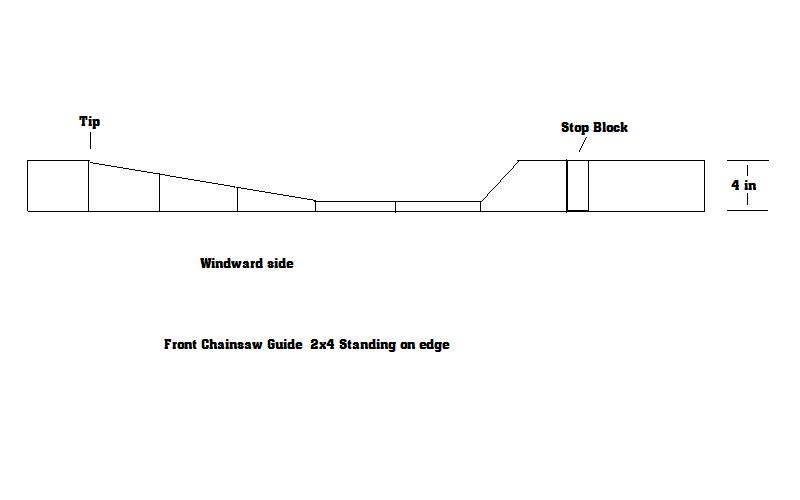
Using a saw, cut along the line. On the right hand end, take the line back to the top so that you remove the piece from
the 2x4.


" alt="" class="bbc_img" />
This is the front side (side you work from). With the blade lying on the jig base board (2x8), position the
2x4 that you just cut so the cut line lines up with the drop line that you marked on the trailing edge of the blade.
Screw the 2x4 to the 2x8 using 3 inch screws. The other 2x4 for this jig needs to align with the leading edge
of the blade, and screw it to the base board. Your jig for the windward side is done.
I used clamps to keep the blade from moving when I used the chainsaw. The only problem with that is, you have to stop and reposition the clamps
before you can finish the cut. It didn’t bother me, but you may not like doing that.
The jig for the airfoil side is done basically the same.
Screw a stop block to the jig base board.
Mark the blade thickness on the edges of the blade at each station. Then connect them with a straight line just
like we did with the drop. Remember this is thickness, not drop.
Since we just cut the other side of the blade, the tip and root are not on the same plane.
I screwed a block to the jig base under the tip of the blade to keep it level.
Lay the blade on the jig base, airfoil side up. On mine the leading edge is toward me, stop block on the right end.
Take one of the 2x4’s and hold it against the front edge of the jig base. Slide it up or down until it lines up with
the line for the thickness. Screw it in to place. Do the same thing with the 2x4 for the rear edge of the base (trailing edge).
Your jig is ready to use.
Some things that you should know----------
You are going to ruin a drill bit when you drill the chainsaw bar if you drill too fast or do not use lubricant.
Chainsaw bars are extremely hard steel.
Use a drill press (pillar drill).
Use the largest chain saw you have (engine size not bar length). Ripping wood is tougher and slower than cross cutting.
Take your time. Do not try to force the chain through the wood.
Think safety. Chainsaws are extremely dangerous.
You must keep the blade from moving when using the chainsaw. I didn’t want screw holes in my blade, so I
used clamps. You can use blocks to help hold it in position.
I am not trying to teach you how to make blades. I am trying to explain how to make the jigs.
If I have forgotten something, please tell me and I will try to correct it.
Ralph