Author Topic: Truck battery box  (Read 10214 times)

0 Members and 1 Guest are viewing this topic.

Offline MadScientist267

  • Impossible Condition Curator
  • Moderator
  • Hero Member
  • *****
  • Posts: 1514
  • Karma: +44/-4
  • Rules? What rules?
Truck battery box
« on: September 15, 2014, 10:43:55 pm »
I thought maybe this one would get squeezed into the main story somehow, but both it and the "power board" seem to be worthy of their own entries... Building an internal battery box for this has become much more than originally envisioned somehow, even though there has been no "feature creep" to speak of...  :o

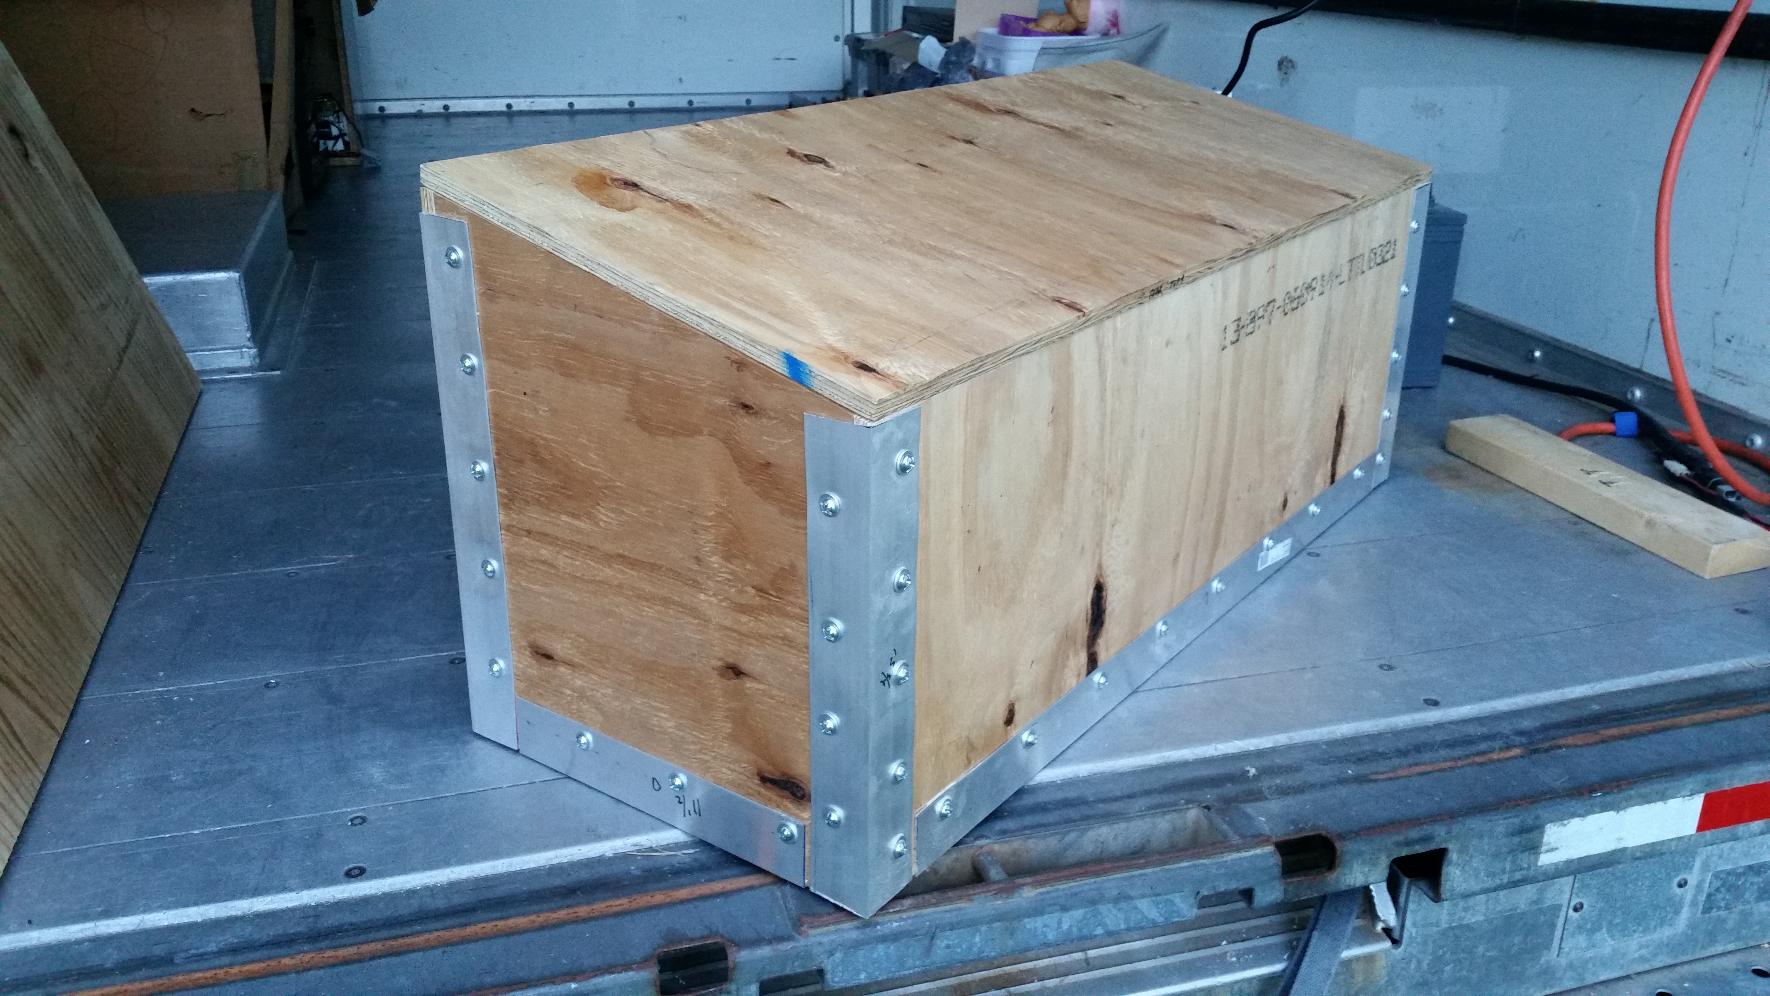
The choice to go internal was a difficult one but is well in motion now, and the result is an aluminum angle reinforced 5/8" 5 ply wooden box that is slowly evolving into being what it needs to be...
3240-0

Here it is as it presently sits.. Not really much to look at... slopes up toward the hydrogen vent plumbing, and designed to stay together as much as a box with it's construction and intent may be able to in the event the unspeakable happens. More on that in a few. The lid will be removable for maintenance, and will incorporate a few tricks to assist with any aforementioned disaster, should one strike.
3242-1

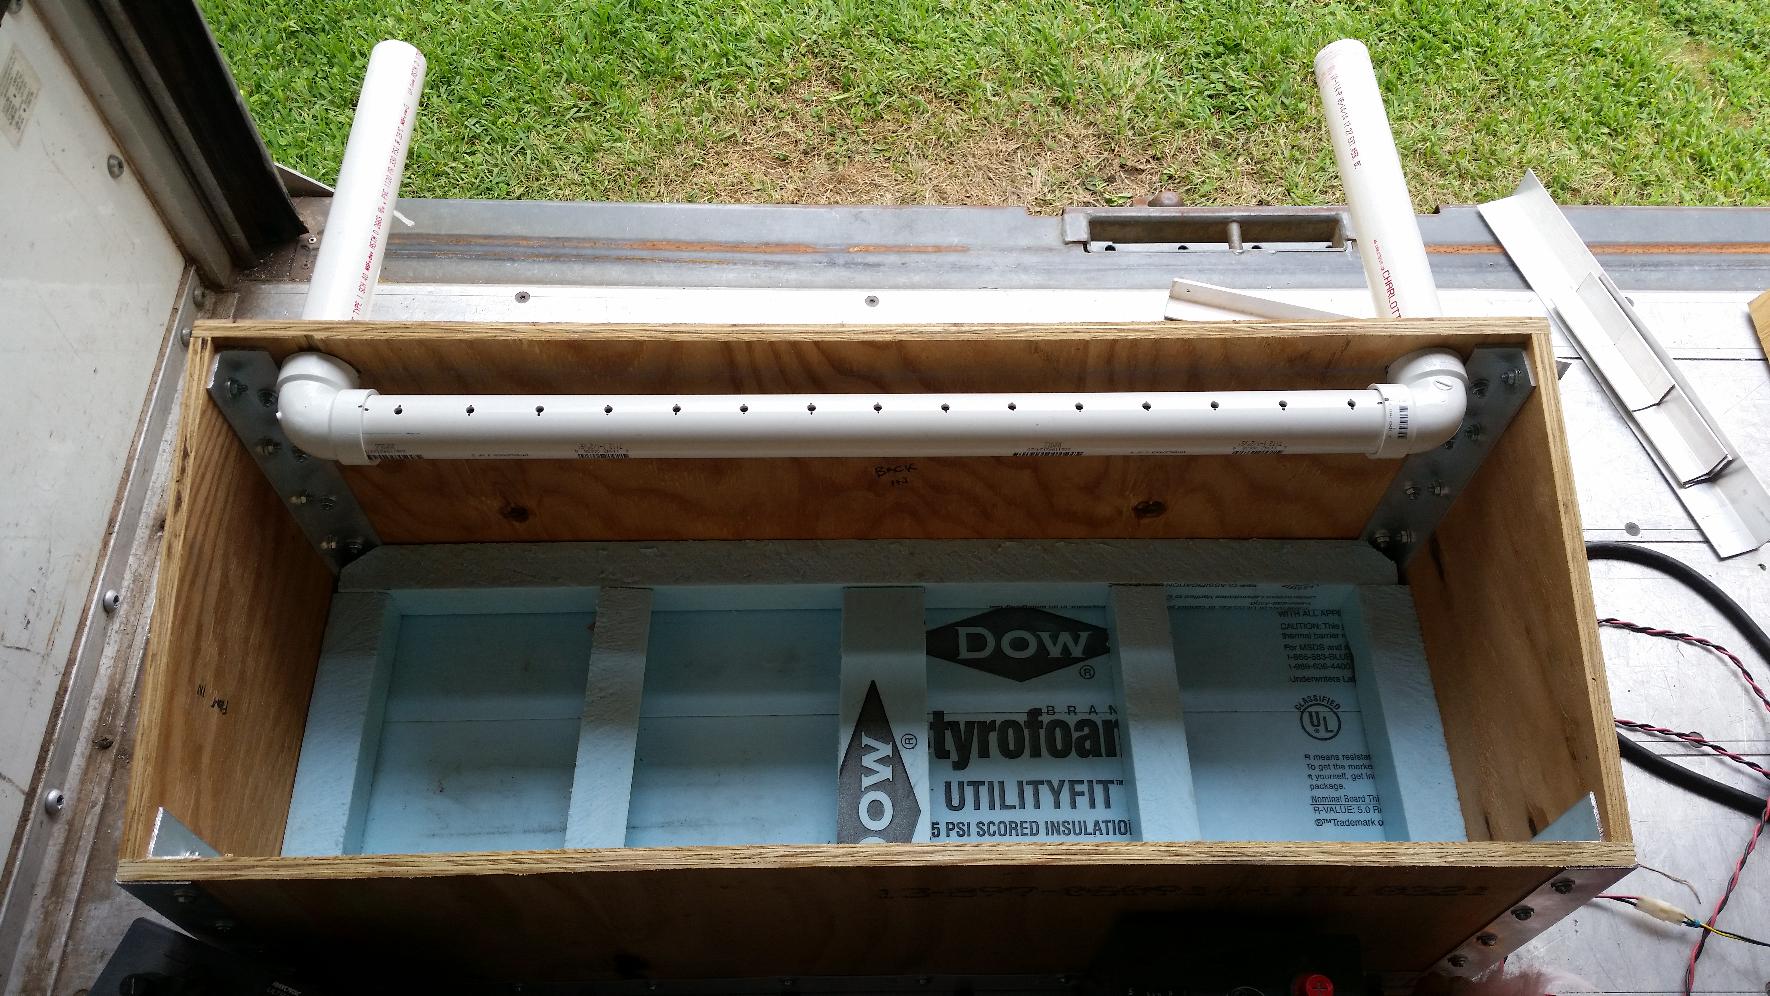
Here's a shot illustrating the position and configuration of the hydrogen vent, as well as the allocation foam that will help keep the individual batteries in something resembling a uniform environment/configuration. Also visible is the interior angle that's bolted to the outer which forms the braces. The bottom is done in a manner very similar to the sides, although the *actual* bottom does not yet have any holes/bolts. This is mainly because the exact anchoring scheme isn't 100% figured out yet, but I'm pondering it rather intently.

Fair enough, no? Well, holding with the "let's keep it together no matter what" concept, there was a hurdle to be dealt with involving the lid. It needs to be able to be opened every couple months or so at the very least for water, and any other maintenance that may need to be performed. Yet, it needs to be able to contain an explosion...

I was originally thinking some kind of compression fit yet "breakable" design, so that if gases suddenly needed to escape, that's what would let go, allowing any spilled acid and shrapnel to be contained in the box (yes, I'm dealing with the concept that wood is porous and has small cracks at the joints as well, but for now...)

This wasn't really ideal for a few reasons... One, it left the lid vulnerable. There wasn't a dirt simple way to make it removable and reinforce it at the same time. Second, it involved trying to coordinate the tensioning devices so that they could absorb/relieve/mitigate the energy that would be present and pop open uniformly instead of buckling and/or peeling back like a banana. Third, any maintenance operation for any reason whatsoever meant resetting everything every time. I was prepared to deal with it until a more viable solution came from a conversation in IRC (thanks Addie!), which I adjusted slightly and came up with this:

3244-2

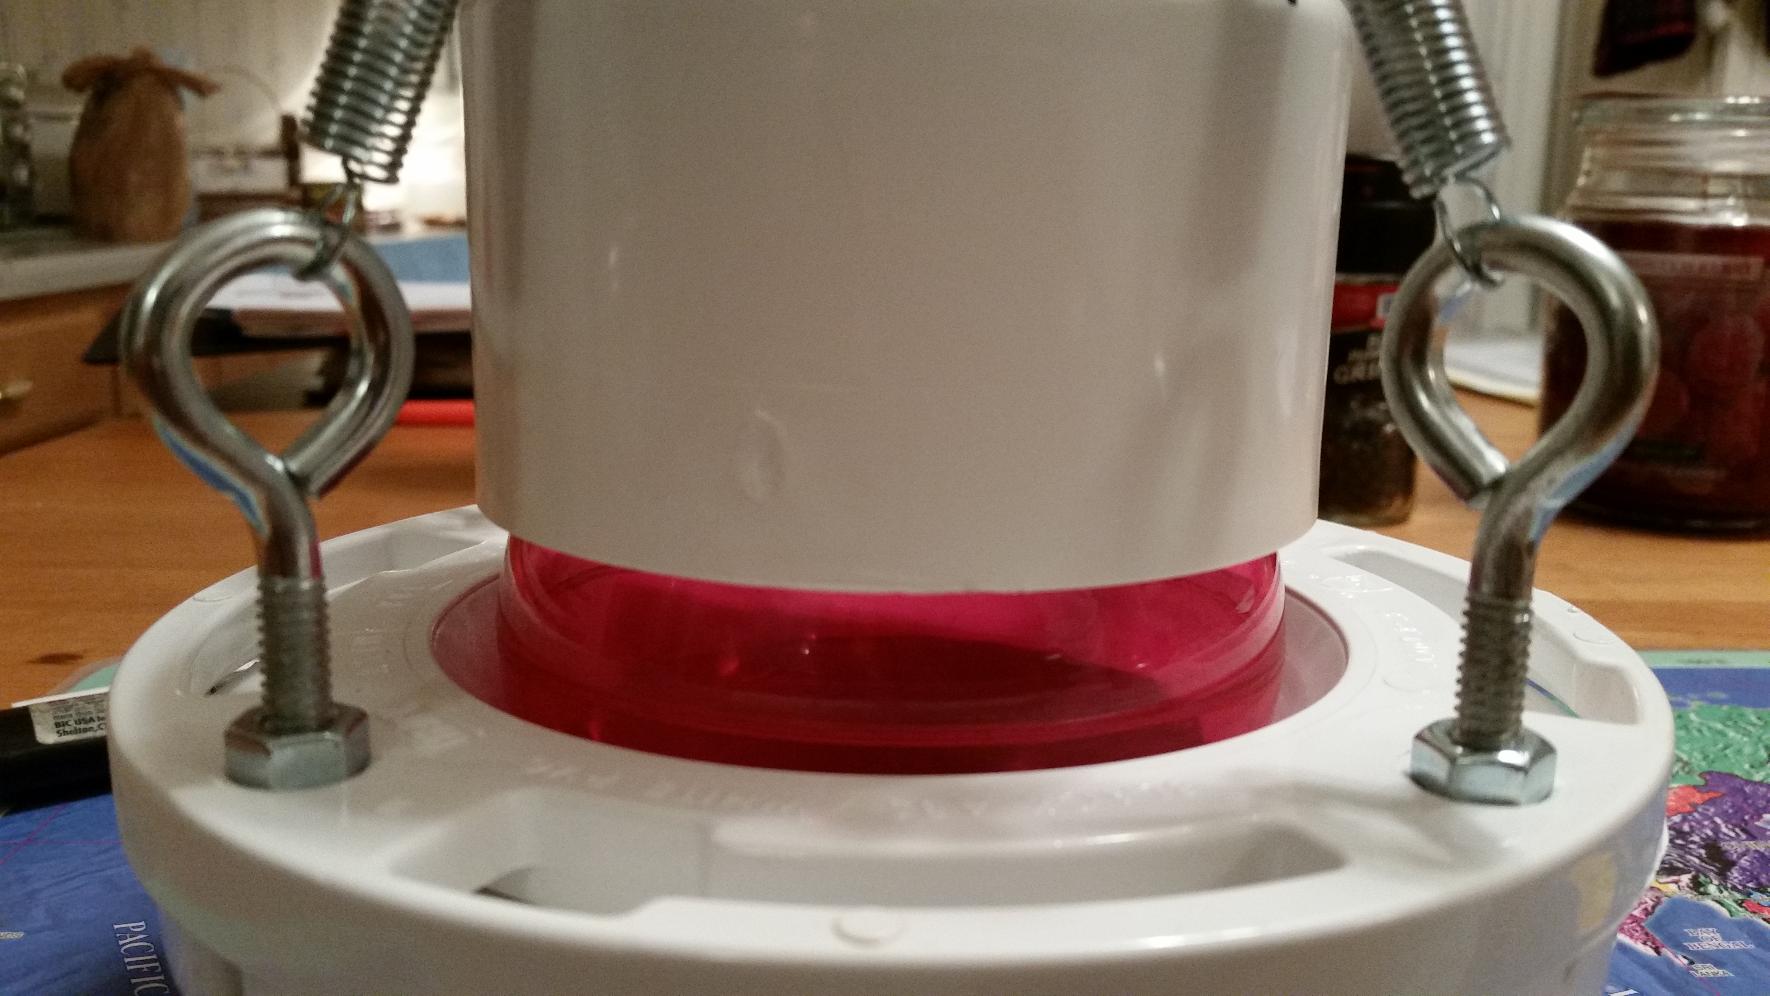
It's a self-resetting emergency vent valve made from a 3" toilet flange, a rubber ball, a 3" PVC cap, some eye bolts, and 4 springs. It's not quite complete as pictured in these shots, as I intend to have large zip ties act as travel stops (to keep it from breaking completely free and becoming it's own projectile) and likely some form of inverted bucket (with venting) to help trap any acid spray that may be present during a release.

Some more shots of it:

3246-3
The underbelly


3248-4
Close up of the underbelly


3250-5
Close up of the mating section

Whether or not this thing is truly capable of what it's designed to do is an unknown, and quite honestly, I hope it stays that way. I have no intentions of staging any tests for it to see how it actually performs. Responsible behavior or borderline criminally insane, I'll let you be the judge. But I don't have the funds to replace everything if it doesn't work, and quite frankly, don't have the nerves to do the test if I did. If anyone wants to build one and test it, by all means, but if you want to hear any results from me, let's just say you'd have to be one sick individual  :-X

Actual mounting location on the lid is still kinda up in the air... I'd like some feedback from you guys on what you think might be best. I can rule out a few locations simply due to space constraints - the "lower" half of the lid is pretty much out. I'd like to avoid using the sides as well (of the box, not the lid), although there may be some benefit I'm not currently seeing to putting it there. Original "on-paper" thinking was in the center, but then I got to pondering it, this might be the worst possible location - the center of the lid is likely to flex the most as is, and even though there is a reinforcement ring that goes behind the device on the inside and some adhesive involved, a hole is a hole and will only weaken things, regardless.

Thoughts?

Steve
Wanted: Schrödinger's cat, dead and alive.

Offline Wolvenar

  • Senior Moderator
  • Hero Member
  • *******
  • Posts: 1474
  • Karma: +40/-0
  • Mr. Murphys pawn
Re: Truck battery box
« Reply #1 on: September 15, 2014, 11:08:14 pm »
I think I would make a single rupture or better, a check valve type "restraint" system.
The springs holding the ball down to me would seem to invite additional problems.
Specifically, the springs just may be holding enough pressure on that ball, where the box may rupture first.

I would have something around the ball, so it would work more like a gravity check valve.

Trying to make power from alternative energy any which way I can.
Just to abuse what I make. (and run this site)

Offline MadScientist267

  • Impossible Condition Curator
  • Moderator
  • Hero Member
  • *****
  • Posts: 1514
  • Karma: +44/-4
  • Rules? What rules?
Re: Truck battery box
« Reply #2 on: September 16, 2014, 12:06:37 am »
Phew I'd hope not. They're rated <1lb/ea working tension, and not very stressed at all. It doesn't take much pressure to open it, but without them it doesn't make a worthwhile seal.

I was having trouble at first finding what I considered a good match in terms of ball and flange (in fact what you see above is the result of hours of hunting, fiddling, and pondering, and only like a half hour of construction/assembly)... The ball I finally came up with is just soft enough that it seals well (passes water/gravity test), but hard enough it doesn't stick in the seat.

I suppose I could do some static tests possibly, with things like weight and vacuum etc, to test where the seal breaks, but if I had to guess, I'd say it's somewhere in the fraction of a PSI range based on the pressure it takes from a thumb etc. I do worry that maybe it can't open far enough tho, which could of course cause an identical issue. At least the version presented is using 3" pipe and not the 2" parts I was originally playing with.
Wanted: Schrödinger's cat, dead and alive.

Offline MadScientist267

  • Impossible Condition Curator
  • Moderator
  • Hero Member
  • *****
  • Posts: 1514
  • Karma: +44/-4
  • Rules? What rules?
Re: Truck battery box
« Reply #3 on: September 16, 2014, 11:43:08 pm »
I did some tweaking today on it, mainly on the springs... gave them a little bit of a workout, slightly stretching them. I didn't have any more slack I could give them without running out of eye bolt. After the stretching, I actually had a little extra slack in the bolts, so I tightened them up to the point where it just closes, then one more turn on each nut (1/4-20 hardware).

It now doesn't completely seal on its own, due to minor imperfections in the flange that I wasn't able to get completely out, but a light thump on the cap will cause it to finish seating, and picking it up by the cap opens it just shy of half an inch under the weight of the rest of it. VERY little pressure on the ball with a finger will readily open it, so it's about as close to a "gravity powered" check valve as it can really get, and honestly I may tinker with it some more to get it a little tighter. If it doesn't hold the hydrogen back, I might as well leave the ball out of it.

Positioning was scrutinized today as well... unfortunately, there's only one suitable location for it, just above center "vertically" on the lid. It wouldn't operate properly now (due to the reduced spring tension) if it were anywhere but on top, and there's no clearance for it except for right where it's going, give or take an inch or two to the left or right. Doing so might even be worse than pointless, as it would place it more over top of one battery or another, potentially collecting more spray, yada.

I got the rest of the supplies today, should have this one just about in the bag either tomorrow or the next day.

Until then...
Wanted: Schrödinger's cat, dead and alive.

Offline tomw

  • Not as bad as you might think
  • Senior Moderator
  • Hero Member
  • *******
  • Posts: 739
  • Karma: +35/-0
  • hoplophobic people will fear my lifestyle
    • Zubbly's photos!
Re: Truck battery box
« Reply #4 on: September 17, 2014, 08:05:06 am »
Man you are making this complexicated..

Just build a proper sized airlock like  used for wine / beer making.

Simple goose neck with water in it can adjust relief pressure by the water columnheight. Or could use mineral oil.

Just my first pass. You are using a 10 megaton nuke to kill a flea here IMHO.

T
Do NOT mistake me for any kind of "expert".

( ?° ?? ?°)


24 Trina 310 watt modules, SMA SunnyBoy 7.7 KW Grid Tie inverter.

I thought that they were angels, but much to my surprise, We climbed aboard their starship and headed for the skies

Offline MadScientist267

  • Impossible Condition Curator
  • Moderator
  • Hero Member
  • *****
  • Posts: 1514
  • Karma: +44/-4
  • Rules? What rules?
Re: Truck battery box
« Reply #5 on: September 17, 2014, 11:59:42 pm »
Tom - If it were stationary I'd find another way... but being mobile, yes, that complicates everything unfortunately. No liquids is one of my "rules" as well. The ball valve should work fine... probably will be installing it tomorrow.

One of my biggest things on this was to get away from all the shady crap going on in the van. Most of what's set up in there is scary as hell, I didn't want any "fear factor" with this, so while yes I'm overbuilding a few things, they're designed to take more than I'll ever be able to throw at them. The idea is to have simple, safe, rugged, low maintenance operation when it's all said and done so that I don't have to worry about anything. Water the batteries every so often and that's it.

These two projects (battery box and power board) are the most complex part of anything, with the wifi dome coming in as a solid third. Everything else is set to be as straightforward and simple as I possibly can get it.

More as it comes...

Steve
Wanted: Schrödinger's cat, dead and alive.

Offline MadScientist267

  • Impossible Condition Curator
  • Moderator
  • Hero Member
  • *****
  • Posts: 1514
  • Karma: +44/-4
  • Rules? What rules?
Re: Truck battery box
« Reply #6 on: November 15, 2014, 10:12:38 pm »
Little update...

Got into laying the floor as well as other things, and finally implemented some of the final versions of a few aspects with the battery box in the process.

First off, the ball idea was abandoned. I got paranoid about cutting such a large hole in the lid, thinking it might do more harm than good, so I've omitted it. I have plans for it elsewhere... I'll post about that when the time comes.  8)

With the floor laid, the hole was cut out of one solid sheet to help improve overall strength, as I have decided not to bolt the box itself down to the aluminum flooring, nor the batteries to anything inside it. It may not be the best design, but there will be some "doomsday devices" installed to help protect against shorting in the event of a collision. More on this later...

The hole:

3511-0

The lower majority of the box has been sealed with "flex rubber", which turned out to not be rubber at all, but a tar...

3513-1
(no, that's not warped wood, this camera has rather prominent fish-eye)  ::)

This briefly caused some panic as I was expecting everything to harden up and become inert. I feared the tar and foam may interact in a number of ways, notably the tar eating the foam, and any motion of the foam causing the seal to fail. After some thought, the idea of plastic sheeting came up... a few quick cuts later, problem solved...

3515-2

The foam blocks were then reinstalled...

3517-3

...and the batteries reconnected. Also at this time, the wimpy undersize, cut short #4 was replaced with 1/0 and new lugs, complete with sealing heat shrink. I came up short one lug, so the "B" pair is safely laying on either side of the installed string. Should have the missing lug here shortly.

3519-4

There are three remaining things to do before the battery bank can be considered complete. Drilling the hole for the hydrogen vent, applying the seal to the lid/box interface, and securing the box to the wood floor using angle brackets in one form or another. This will be one of the last things done, as it will represent a relatively large impedance to any future disassembly/reassembly that may need to happen as construction continues (occurring a lot now that the weather is colder).

Here it is with the lid secured:

3521-5

More as it comes...

Steve
Wanted: Schrödinger's cat, dead and alive.

Offline ZoNiE

  • Newbie
  • *
  • Posts: 13
  • Karma: +0/-0
Re: Truck battery box
« Reply #7 on: November 17, 2014, 11:15:53 am »
Steve, you may want to try "Spilling" some battery acid on a scrap of that foam to see what happens. Will it melt? Will it outgas some thing that may poison you? Will it just stink up the truck but not go away? Just a thought. If you already tested it, forgive me, I don't think I've wended my way through all of your posts yet.

Offline MadScientist267

  • Impossible Condition Curator
  • Moderator
  • Hero Member
  • *****
  • Posts: 1514
  • Karma: +44/-4
  • Rules? What rules?
Re: Truck battery box
« Reply #8 on: July 09, 2015, 12:48:04 pm »
I never did get around to testing that ZoNiE... I'm hoping it never happens of course, but that I can run like hell after such an event. So far that's not the only thing I'd go after differently... LOL

There's another issue that wasn't exactly any kind of secret, but I wasn't really sure of the best way to deal with in this version, and that is cooling the batteries in summer. In the van I used a night-based opportunistic thing involving a differential thermostat and a fan that ran air over the batteries when the outside air was cooler at night (remember the heatsinks? LOL) and was reversible for winter so it could try and pull some of the heat from the day air. It worked reasonably well but there were aspects about it that presented problems for the truck design that I didn't have solutions for.

Enter a cool little toy that DaveW sent my way...

4173-0

Nice little 150W(Q) Peltier unit... By design it was supposed to be able to both heat and cool, automatically adjusting and changing modes etc as necessary to keep a small environmentally controlled chamber at a preset temp. Perfect!

There turned out to be some kind of issue either in the controller or in control of the fingers in control of the thermostat knob, as all I could get it to do was wide open cooling regardless of setting. The power connector was also unlike anything I had a match for, so the unit had to be slightly disassembled to see wiring to connect it. When the "problem" (whatever the cause) with the controller came about, I decided to just completely rebuild the unit and fine tune it physically for it's new purpose in life.

I completely disassembled it, cleaned everything thoroughly, and put it back together, slightly rearranged and with new modules. The disassembly was somewhat destructive, and even though the original modules were intact and still operational, they were not sealed by any means and condensation is a well known enemy to them. I had a box of brand new in the box 50W(Q) modules that were destined for the circular file until this project came up, so I figured why not...

4175-1

Here is the rebuilt module undergoing burn-in before final heatsink torquing, with a surrogate fan on the cold side.

It works well on the bench, but time will tell it's effectiveness in the box...

4177-2

Here it is in a test cover for the box made of some leftover 2" foam. As it sits, power input is between 30 and 40W (varies slightly with ambient and delta temps)... I'm not expecting much at this low of an input, but want to just get a feel for how what I observed on the bench translates to the implement before I ramp up the juice.

I know everyone is asking "Why Peltier? They're SO inefficient!". You're absolutely correct, but this would be one of those niche applications for them where the inefficiency doesn't matter.

I'm still tossing pros and cons around for which one of two methods would work best for providing it's power... but regardless of which, it will be only using surplus solar in the summer that would have just been otherwise going to waste. Neither would operate solely on battery power at any time.

The two options on the table at present are:

1. One of the five PV strings can be switched away from the classic and directly feed the Peltier. This has the benefit of simplicity and a direct relationship between heat influx, charge source availability (which generates most of the heat that the batteries accumulate), and cooling power (Q). The primary drawback to this method is no temperature control, so the unit may cool more than necessary (which isn't really the biggest issue, the extra heat it dumps into an already thermally challenged living space becomes the primary concern once the batteries are at a modest temp).

2. Make a controller utilizing a hefty buck converter and control the input based on the battery temperature. This has the benefit of a potentially much more stable battery temperature, and would only load the room with as much heat as is necessary to keep the batteries at temp. The major drawback being complexity and reliability. The converter would be at the very upper edge of a homebrew "catch diode" type converter's practicality mark. PWM would be simpler, but introduces another concept that's detrimental to the longevity of Peltier modules.

So the question lives on... but for now, it needs to just run in different modes while being observed for performance.

So, until I know more...

Steve
Wanted: Schrödinger's cat, dead and alive.

Offline rossw

  • Senior Moderator
  • Hero Member
  • *******
  • Posts: 879
  • Karma: +35/-0
  • Grumpy-old-Unix-Admin
Re: Truck battery box
« Reply #9 on: July 09, 2015, 04:43:42 pm »
1. One of the five PV strings can be switched away from the classic and directly feed the Peltier. This has the benefit of simplicity and a direct relationship between heat influx, charge source availability (which generates most of the heat that the batteries accumulate), and cooling power (Q). The primary drawback to this method is no temperature control, so the unit may cool more than necessary (which isn't really the biggest issue, the extra heat it dumps into an already thermally challenged living space becomes the primary concern once the batteries are at a modest temp).

IIRC, peltier junctions are HIGHLY sensitive to over-voltage, and a complete peltier device has a heap of parallel (or series-parallel) junctions. If you over-volt, some junctions fail, increasing the stress on the rest, which fail even faster. Can you say "cascade"?

If running it directly from a PV, I'd really want to see some sort of voltage limiting there...

Offline MadScientist267

  • Impossible Condition Curator
  • Moderator
  • Hero Member
  • *****
  • Posts: 1514
  • Karma: +44/-4
  • Rules? What rules?
Re: Truck battery box
« Reply #10 on: July 09, 2015, 07:37:54 pm »
Hopefully this is covered...

I'm thinking a single string of the smaller panels, totaling 100W on the label... Presently, the Peltier modules are wired in series, for 36V nominal. Datasheet gives 14.2V as the worst case minimum for a single module, rendering a 42.6V limit for the set @25C hot side (tolerable voltage goes up with this temp, 16.2V @ 50C etc)

The Voc of the string is ~44V, however there's inherent protection in the idea that they can't reach that voltage when connected because even Isc is only 3.16A for those panels, well within the limits of what the Peltiers are rated for (5.2A max).

Vmp for each panel is 17.4V, not that there would be any kind of MPPT involved, but even if it somehow magically finds itself at Pmax, there is a 36V nominal "module" being fed 34.8V at 2.87A (The Imp by label), yielding a maximum of 99.876W; each module capable of sinking 75W on their own, but only being fed ~33W each.

Moral of the story is, driving them at <50% handling capability, they should be ok... Yah? Hehe

http://tinyurl.com/pg3co3e   <-- Scrunched up URL for the direct module datasheet download, for sanity... if I'm missing anything of course I'd certainly want to know before I finalize...?

Steve
Wanted: Schrödinger's cat, dead and alive.

Offline MadScientist267

  • Impossible Condition Curator
  • Moderator
  • Hero Member
  • *****
  • Posts: 1514
  • Karma: +44/-4
  • Rules? What rules?
Re: Truck battery box
« Reply #11 on: July 13, 2015, 03:50:24 am »
Little update...

It is working, at least under test conditions... which admittedly is not really even comparable to how it'll actually be operating, but I needed to kill as many variables as I could so that expectations become a little more clear...

That said... ahem LOL

4181-0
The basic behavior... There are so many things that determine what comes up right here it's not even funny... There are 3 I have my sights on at the moment, with a couple others on the back burner. One is that the minimum cold side heatsink temp (Tc) is highly dependent on the temperature of the hot side (Th).

4182-1
It's not hard to see that I have the Peltier and the fridge sharing a little bit too much air... But this was partly a strategic move. Until I had data illustrating it's behavior, I needed to make sure that in the event I needed to set up dedicated vents, it would be much simpler with them closer together. Jury is still out on whether or not this will actually be warranted, tho rumor has it they're reaching a decision LOL

4183-2
The associated room air temps.

The second aspect I'm looking into is power vs cooling... There's a sweet spot in there to be had, tho nailing it down is somewhat dependent on everything else being set up as efficiently as possible first.

To this end, I'm in the process of getting 1/2" foam cut and placed inside on the walls and lid; the batteries are already sitting on a 2" buffer and spaced by more of the same.

It also involves efficiently coupling the batteries to the cold heatsink, which basically involves fan selection/position, internal shaping (rounding corners etc) and possibly even baffling to help balance the airflow around each battery. The latter probably will get the least attention as it requires much more time and data collection than is practical.

Third, this thing makes water! Duh...

Lots of water. Box sealing will only help so much, as there's an intentional "leak" leading to the outside (remember hydrogen?) ... So I'll be dealing with that sooner than later as well.

Anybody besides me ever notice they don't mention this stuff in the brochures? :o

More as it comes...

Steve
Wanted: Schrödinger's cat, dead and alive.

Offline rossw

  • Senior Moderator
  • Hero Member
  • *******
  • Posts: 879
  • Karma: +35/-0
  • Grumpy-old-Unix-Admin
Re: Truck battery box
« Reply #12 on: July 13, 2015, 04:11:19 am »
The second aspect I'm looking into is power vs cooling... There's a sweet spot in there to be had, tho nailing it down is somewhat dependent on everything else being set up as efficiently as possible first.

Law of diminishing returns....The first 50% is easy...

Quote
Third, this thing makes water! Duh...
Lots of water.

Only if you cool below the dewpoint.
That's a bit of a double-edged sword too.
A simple and inexpensive humidity sensor might not be a bad idea, question is then, do you try to cool only to "about dewpoint" to minimise condensation, or do you try to get it as cool as you can on the spare power you have (and deal with the water)?!

Offline rossw

  • Senior Moderator
  • Hero Member
  • *******
  • Posts: 879
  • Karma: +35/-0
  • Grumpy-old-Unix-Admin
Re: Truck battery box
« Reply #13 on: July 13, 2015, 06:27:45 am »
Not specifically to you, Steve.... more of an anecdote/warning/consideration for all of us!

You know how sometimes, we put an alarm on things that are important? Like a boiler over-temperature, or a low oil-level on a generator, or a hundred other things that are potentially dangerous or expensive if left unchecked?

Well, something I've (tried) to do for as long as I can remember, is to make "critical" systems somehow be checked from time to time. It paid off yesterday... the same alarm that goes off for genset low oil, high temperature, boiler over-temp, etc, etc, gets briefly tested each time the generator starts. It's just a 2-second constant tone - not an interrupted beeping like most of the other alarms are, but it's enough to enable us to regularly check the alarm operation.

Well, yesterday it made a couple of strangulated blurps and fell silent. It turns out a wire had failed due to vibration fatigue after 10 years (on the genset itself), which was trivial to fix - but the importance of checking it can't be understated. I may have never known it'd failed - and if we had a problem, I'd be oblivious to it until it was all too late....

So to those who (like me) have alarms on things, consider a regular "automatic" check that will just let you keep on knowing it's probably going to go off when you need it!

Offline Wolvenar

  • Senior Moderator
  • Hero Member
  • *******
  • Posts: 1474
  • Karma: +40/-0
  • Mr. Murphys pawn
Re: Truck battery box
« Reply #14 on: July 13, 2015, 06:09:42 pm »
Great advice Ross.
Trying to make power from alternative energy any which way I can.
Just to abuse what I make. (and run this site)