Author Topic: Toy Turbine #3  (Read 11875 times)

0 Members and 1 Guest are viewing this topic.

Offline JeffD

  • Newbie
  • *
  • Posts: 17
  • Karma: +9/-0
  • No Personal Text Set by User
Toy Turbine #3
« on: February 08, 2012, 01:36:02 pm »
Built a 0.6 meter diameter 3 blade toy wind turbine back in January of 2010.  I used Hugh Piggott's 2005 plans and scaled the 1.2m to 0.6m.  Also used Hugh's blade calculator to verify the blade templates.

Here is a pic of it on 8 Feb 2012 after running for 2 years 24 hours a day.
455-0

Some pictures from previous years (before I finally painted the blades in October 2011):
457-1


This toy turbine is the third to be built since 2007 and is used for charging a small battery bank used for lighting in the house and running a netbook.

I used Flux's boost converter method for matching the prop to the alternator ie the boost operates up until about 6.5m/s and cuts out and the main rectifiers take over.
 

Offline JeffD

  • Newbie
  • *
  • Posts: 17
  • Karma: +9/-0
  • No Personal Text Set by User
Re: Toy Turbine #3
« Reply #1 on: February 08, 2012, 01:55:46 pm »
Some pictures of the blades being built:

460-0

461-1

462-2

463-3

464-4

465-5

466-6

Blades were built from a spruce 2x4 that had been behind the shed for a few years.  Used a hacksaw and chisel to do the rough shaping of the blades.  Used the chisel and a scraper for the final shaping.  Took about five hours from start to finish.  Had the three blades cut out in about an hour but took a little over an hour of final shaping for each blade.  Used Hugh's method of cutting out the blades.

Offline JeffD

  • Newbie
  • *
  • Posts: 17
  • Karma: +9/-0
  • No Personal Text Set by User
Re: Toy Turbine #3
« Reply #2 on: February 08, 2012, 02:39:49 pm »
Here is a picture of the stator:

467-0

It is wired for 3 phase star.  Each phase is made up of 8 coils and each coil has 8 turns of 22 AWG wire.  Each phase has a resistance of 0.41 ohms so resistance between two phases is 0.82 ohms.

The stator has a thickness of 1.5mm where the magnets travel.

There are two magnet plates, with each plate holding 8 magnets.  The magnets are 3/4" x 1/4" N38 NdFeB.  The air gap is 3.5mm.

Volts/RPM is 0.011.  The stator puts out about 13.5vdc (after the rectifiers and under load) when the turbine is spinning at about  1363 RPM.  This is the cutin speed of the main rectifiers when battery voltage is about 13vdc and is when the boost converter starts to cut back.  The boost converter cuts in at about 0.8vdc.  I know that last statement will raise some eyebrows and I will explain how the boost converter can achieve that in another post.

The boost and main rectifiers are composed of Schottky diodes since this is for a 12v system.

Offline bj

  • Hero Member
  • *****
  • Posts: 735
  • Karma: +23/-0
  • Lamont, Alberta, Canada
Re: Toy Turbine #3
« Reply #3 on: February 08, 2012, 04:12:39 pm »
   It may not be real big, but it is a sweet machine. ;D
   Thanks for the share
"Even a blind squirrel will find an acorn once in a while"
bj

Offline bvan1941

  • Full Member
  • ***
  • Posts: 113
  • Karma: +5/-0
  • No Personal Text Set by User
Re: Toy Turbine #3
« Reply #4 on: February 08, 2012, 04:36:45 pm »
JeffD,
Real nice work!
big isn't always better, quality is obvious in your project. Hope you elaborate and give periodical updates. 1367 rpms-- whew!
what kind of winds do you have and is that top end rpms?
Keep posting,
Bill

Offline artv

  • Jr. Member
  • **
  • Posts: 47
  • Karma: +1/-1
  • No Personal Text Set by User
Re: Toy Turbine #3
« Reply #5 on: February 08, 2012, 06:39:30 pm »
Hi Jeff,
It's funny I've been doing lots of reading on links provided by Woofer and am currently reading about boost converters.
So will be looking forward to future postes.
Nice blades ,for the amount of time,.....I haven't even started thinking about blades yet,..still working on the generator.
Thanks for posting........artv

Offline philb

  • Full Member
  • ***
  • Posts: 123
  • Karma: +6/-0
  • No Personal Text Set by User
Re: Toy Turbine #3
« Reply #6 on: February 08, 2012, 09:08:21 pm »
Not all turbines have to be big to be useful. Thanks for posting!

Do you have additional pictures of your stator?

Offline JeffD

  • Newbie
  • *
  • Posts: 17
  • Karma: +9/-0
  • No Personal Text Set by User
Re: Toy Turbine #3
« Reply #7 on: February 09, 2012, 11:50:33 am »
Here is a diagram showing the layout  of the phases (A, B, C) in relation to the magnets.

479-0

So phase A is the light and dark blue coils.  The light blue coils are wound in the opposite direction to the dark blue coils.  Phase B is composed of the light and dark green coils. Phase C is composed of the light and dark red coils.

Here is a picture showing the completed stator after casting in epoxy:

480-1

The same picture as above but showing the phases highlighted in colours and the direction of the windings:

481-2

Offline JeffD

  • Newbie
  • *
  • Posts: 17
  • Karma: +9/-0
  • No Personal Text Set by User
Re: Toy Turbine #3
« Reply #8 on: February 09, 2012, 12:05:15 pm »
Construction photos of the stator starting with Phase A:

There are 8 coils that make up each phase.  The coils are not wound separately but are wound from a continuous length of wire so that you don't have to solder together the leads of the coils.

Starting the first coil:
482-0
I used a form to mount the coils to.  The form is made from cereal box cardboard.  The surface that will come in contact with the epoxy is coated with a release agent.  I used wax crayon as a release agent.  My daughter picked the colour of the crayon to use :).  This is the bottom portion of the casting form and will not be part of the stator when the stator is finished.  The coil phase diagram that was shown in the previous post is glued to the backside of the form as a reference for where each coil is to be positioned.

The second coil is wound in the opposite direction to the first.  Every second coil is wound in the opposite direction.  The coils are held against the form by using thread.
483-1

First phase almost completed.
484-2

First phase completed.  You can see the start and finish leads for the phase at the top.
485-3

Offline tomw

  • Not as bad as you might think
  • Senior Moderator
  • Hero Member
  • *******
  • Posts: 739
  • Karma: +35/-0
  • hoplophobic people will fear my lifestyle
    • Zubbly's photos!
Re: Toy Turbine #3
« Reply #9 on: February 09, 2012, 12:12:10 pm »
Jeff;

Nicely documented!

Thanks for the share.

Tom
Do NOT mistake me for any kind of "expert".

( ?° ?? ?°)


24 Trina 310 watt modules, SMA SunnyBoy 7.7 KW Grid Tie inverter.

I thought that they were angels, but much to my surprise, We climbed aboard their starship and headed for the skies

Offline JeffD

  • Newbie
  • *
  • Posts: 17
  • Karma: +9/-0
  • No Personal Text Set by User
Re: Toy Turbine #3
« Reply #10 on: February 09, 2012, 12:20:52 pm »
More pictures showing the construction of the other two phases.

Starting the second phase first coil:
486-0

The second phase completed:
487-1

Starting the third phase:
488-2
Yes, it is starting to get a little complicated seeing where the next coil should go.  In later stator builds for toy turbine #4 through #6, I found it easier to wind each phase separately and then put them together before casting.

Third phase completed:
489-3

After forming all the coils for all three phases I realized that I better label the leads before casting otherwise there could be some confusion as to which lead was for what.  The three end leads are connected together for the star point and the other three leads are the start leads and are the 3 phase output leads.


Offline JeffD

  • Newbie
  • *
  • Posts: 17
  • Karma: +9/-0
  • No Personal Text Set by User
Re: Toy Turbine #3
« Reply #11 on: February 09, 2012, 12:38:42 pm »
Time to setup for casting the stator in epoxy.

Here we have the stator along with the bottom release form being placed in the bottom half of the press.
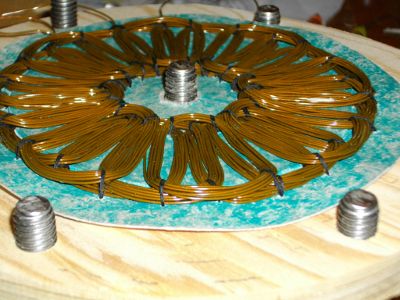
490-0

The seals are formed around the outside and inside circumference of the stator to hold the epoxy in.  I used Kid's Plasticine for the seals.
491-1

I'm missing a picture of the epoxy being poured over the stator so you will have to use your imagination.

Placing the top release form on top of the stator.  Yes, I know, the seals are missing in that photo along with the freshly poured epoxy.  Pretend they are there  ;).
492-2

The top of the press is now attached and the nuts are tightened evenly.
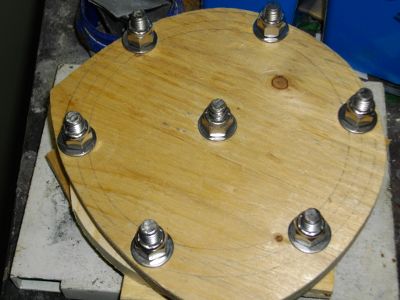
493-3

The epoxy took about ten hours to initially set up.  You can check the state of the epoxy by poking at the epoxy that squeezes out pass the seals.

Here is a picture of the cured cast stator after removing the top.  The blue colour is from the wax (crayon) that was used as a release agent on the form. It washes off easily.
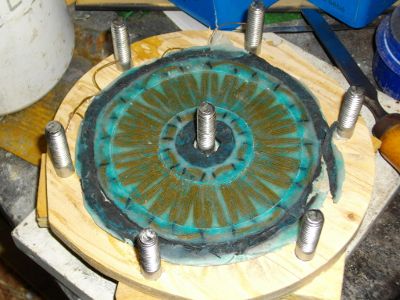
494-4


Offline JeffD

  • Newbie
  • *
  • Posts: 17
  • Karma: +9/-0
  • No Personal Text Set by User
Re: Toy Turbine #3
« Reply #12 on: February 09, 2012, 01:41:27 pm »
Since all of my toy turbines are outside year round in all weather, I use the tail furling system as described in Hugh Piggott's manual.

Here is a picture of the back of the turbine frame.  Its a fairly simple setup.  I just use a 5/16 bolt screwed into the back of the frame and set at the angles described in Hugh's book for the 1.2m turbine.  I used some 3/8" washers on the tail to dial in the furling for around a wind speed of 12 m/s.
495-0

Here is a side view.
496-1

I try to build my turbines from junk I find.  For the frame I used some old hardwood flooring that my neighbor was throwing out.

Here is the turbine up on the tower and shows how the wiring is connected to the alternator and how the turbine frame sits on the tower top pipe.  There is a metal washer that is greased that the frame sits on with the pipe top underneath the washer.  I use one of those braided cable grips at the top of the pipe to hold the cable that goes down the center of the pipe tower.
497-2

The turbine frame was built back in 2007 and was used up until 2010 for a 0.5m turbine.  I dropped that turbine when lowering the tower in Dec 2009 for maintenance.  When the turbine tower fell the turbine planted itself nose first into the ground and smashed two of the blades.  It was a good push to get me into building a bigger turbine.  Yeah, 0.6m is not that much bigger but it is bigger  ;D.


Offline ChrisOlson

  • Hero Member
  • *****
  • Posts: 510
  • Karma: +29/-5
  • just trying to survive
Re: Toy Turbine #3
« Reply #13 on: February 09, 2012, 06:00:02 pm »
Jeff, that is so cool it's beyond description.  Especially the 8 pole 24 coil generator.  Nice!
--
Chris

Offline artv

  • Jr. Member
  • **
  • Posts: 47
  • Karma: +1/-1
  • No Personal Text Set by User
Re: Toy Turbine #3
« Reply #14 on: February 10, 2012, 07:39:59 pm »
Hi Jeff,...I tried making a layerd stator...but got nothing out of it,...obiviously did something wrong
I notice that your coils, are very small....
Not the actual size of the coil ,  but the space between the legs of the coil...

they all play havic with each other......artv